Jump to Mobile
Though Sketchbook is not a writing or typography app, text is an integral part of visual communication. Sketchbook includes simple text features to support the addition and of titles, comments, and captions to any image.
Text in Sketchbook Pro for desktop
Font support
Sketchbook Pro supports native and system fonts on Windows and macOS. Sketchbook Pro also supports most downloadable font sets, including TrueType, OpenType or PostScript fonts. After installing new fonts to your hardware, restart Sketchbook Pro to view them in the font menu in the Text Editor.
Creating Editable Text Layers
Text can be added by tapping the Text icon in the toolbar.
Adding text creates Text layers in your layer stack. Text layers exclusively store text data with font, style and color settings. You cannot draw on a Text layer.
Text layers can be identified by a ‘T’ icon on the left side of the layer preview, which indicates that the text can be edited. Standard features such as Quick Transform, layer visibility, layer opacity and blend modes can be applied to Text layers.
To edit an existing Text layer, tap on the Text layer marking menu ![]() and gesture down to the right to Edit Text layer.
and gesture down to the right to Edit Text layer.
Text layers will only remain editable when saved in Sketchbook Pro’s native TIFF format. When Text layers are saved in PSD format, the layer will be rasterized.
Visibility and layer opacity of the Text layer can be adjusted the same as other layer.
Brush strokes and other image features cannot be applied to a Text Layer until it is rasterized to a regular, paintable layer.
The Rasterize Text Layer option can be found in the Text layer marking menu ![]() . Once a layer is rasterized, the text is converted to pixels and is no longer editable.
. Once a layer is rasterized, the text is converted to pixels and is no longer editable.
Using the Text Editor
- Type or paste text into the body of the text editor. How text appears on canvas differs from how it appears in the editor. In the editor, text will automatically wrap to fit in the window, but only explicit Returns will apply when the text is rendered to layer.
- To change the font, select the text and pick the desired font from the Font pulldown menu.
- To change size, select the text and pick the size from the Size pulldown menu.
- To apply styles:
- On Windows, select the text and activate Bold, Italics, Underline or Underscore buttons.
- On Mac, use the Typeface pulldown menu (not all fonts will have all Typeface options).
- To change colors, select the text, and tap on Color Chip to select colors with the Color Editor.
- When done, tap OK.
- Position the text on the canvas using the Transform puck and tap the
 icon when done.
 - The Text layer will appear above the last active layer in the stack.
Transforming text
Once you've created text with the Text Editor and tapped "OK", you are put in Transform mode on the canvas. Text automatically appears in the center of the canvas, use the Transform puck to move, scale, rotate, flip, or distort it.![]()
Font size determines how much you can scale a font. A font size of 12 cannot be scaled up as much as one set to 24. A font of 12 cannot be scaled down as much as one set to 5. To scale a font further, return to the Text window and increase/decrease the font size.
Editing an existing text layer
If you want to change the text, be it a spelling mistake, to change the font, font size, make something bold, italicized, or underlined, or to change the color, use the Edit Text Layer window.
- In the Layer Editor, at the text layer you want to change, click
 .
. - Select
 Edit Text. This re-opens the Text Editor window for further editing.
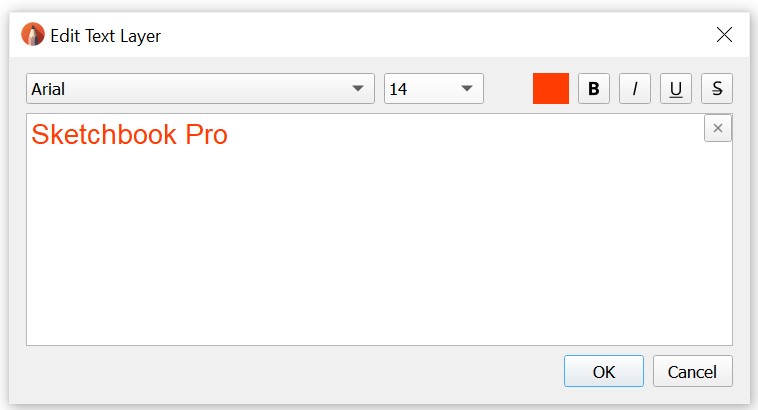

Rasterizing a text layer
Rasterizing permanently converts your text to pixels, allowing you to manipulate it like a paint layer.
- In the Layer Editor, tap-hold the marking menu .
- Select
 Rasterize Text Layer.
Once text is rasterized,  Edit Text can no longer be used.
Using text in Sketchbook for Android and iOS
To add text, select the Text Tool from the toolbar.
On mobile phones, it will be nested under the tools icon.
Before creating text, it is a good idea to make sure the area where text is to be placed is visible on your screen, as you will not be able to adjust the canvas view while you're in the Text Tool.
The Text Tool presents a text toolbar for text entry, text settings and positioning. Tap on these tools to make all your edits, using two-finger gestures to move, scale and rotate the text.
 Text editor - tap to enter and edit text
 Font - tap to present and select your fonts
 Color - tap to open the Color Editor
 Transform - tap to non-proportionally adjust or distort text
 Nudge - tap to present a puck to constrain vertical or horizontal moves freely or one pixel at a time.
 Flip - flip text vertically or horizontally
 Rotate - rotate text clockwise or counterclockwise.

 Flip - flip text vertically or horizontally
When complete, tapping Done will apply the final text to a new layer.
Adding custom installed fonts to Sketchbook on iOS
If additional non-system fonts have been installed to an iOS device, these can be added to the Sketchbook font list. You'll first have to have installed the fonts on your device. See information from Apple on how to do that here.
Then to add the fonts to Sketchbook:
- Enter the Text tool
- Tap Fonts
- tap on the
 icon in the top right of the Font list window. This will open a new dialog to search and select the fonts you wish to add.
Adding custom installed fonts to Sketchbook on Android
Additional fonts can be added to the app by tapping the ![]() Fonts and then the
Fonts and then the ![]() menu in the upper right of the font list window.
menu in the upper right of the font list window.
Tap to import TrueType font files you have downloaded to your device.
Sketchbook on AndroidOS only supports TrueType fonts. You are responsible for making sure you have the correct usage rights for the fonts in your work. Google Fonts is a great resource for royalty-free fonts.
You can add a maximum of 50MB of font files to Sketchbook. Once you reach the maximum, you will need to delete some added fonts in order to add more. It is not possible to delete the six default fonts.
Your custom fonts are saved as part of your Sketchbook Preferences, along with your brush customizations, color palettes, and UI customizations. If you uninstall the app or clear the app's data, your Preferences will be reset to the defaults and your customizations will be gone. It is a good idea to make a back up of your Preferences.
