Jump to Mobile
To successfully fill an area, it must be closed. Tap the paint bucket icon,![]() , then tap a closed region to fill the area with paint.
, then tap a closed region to fill the area with paint.
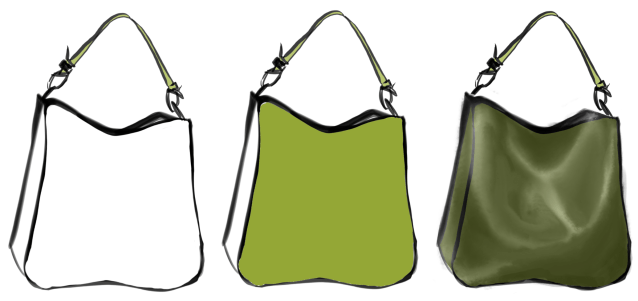
In this example, the first image has a closed area. The second shows a successful fill. The third is the finished product. The fill layer’s opacity was reduced to mute the fill and allow an underlying layer to peak through.
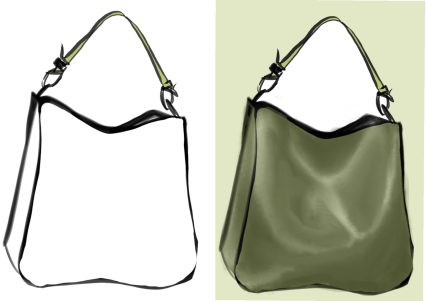
If the fill area is not closed, the fill will invade areas you didn’t intend to color. In the example below, the area in the first image is NOT closed. When a fill was applied, the background, as well as the intended area, was filled. The white areas are the only closed ones.
When you select ![]() , the Flood Fill toolbar appears, containing fills and, depending on the version you're using, an assortment of tools. Use the tools to change fill tolerance, apply a fill to either all layers or only the active layer, or reverse a gradient fill.
, the Flood Fill toolbar appears, containing fills and, depending on the version you're using, an assortment of tools. Use the tools to change fill tolerance, apply a fill to either all layers or only the active layer, or reverse a gradient fill.
Select one of the following fills to add paint to an area bound by pixels of color or a selection. Flood filling an area is a quick way to fill an area with color, make highlights, or create gradations of color for such things as a metal look.
Solid Fill
 Solid Fill
Fills an area with paint.
Gradient Fill
What is a gradient fill? It’s a fill with multiple bands of color that blend into one another. There are two kinds of gradient fills in Sketchbook – Linear and Radial.
 Gradient Linear Fill

It uses a color ramp and applies it linearly from your first tap (origin) to the end of the drag (destination). This establishes the direction and size of the ramp. Fill manipulators can be added, moved, or removed.
 Gradient Radial Fill

It uses a color ramp that radiates from your first tap (origin) to the end of the drag (destination). Fill manipulators can be added, moved, or removed.
Fill Tolerance
Did the fill cover more area than you wanted? Did it not cover enough? Change the tolerance of your fill to determine the range of the area/colors affected. Set the flood region and size of the gaps between the fill paint and pixels creating the fill boundary.
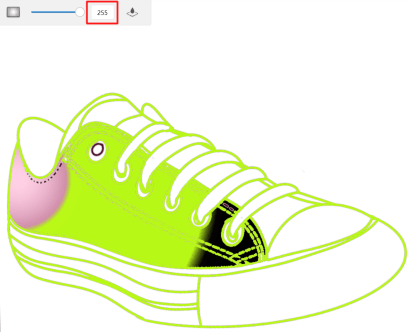
The minimum tolerance, 1, selects and fills only pixels of that color value. The maximum tolerance, 255, selects and fills all pixels regardless of the region.

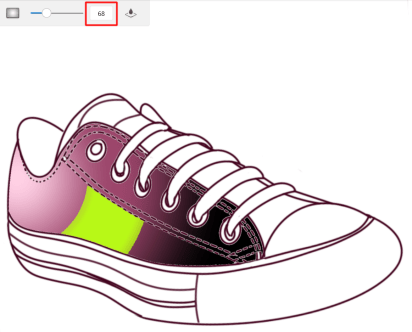
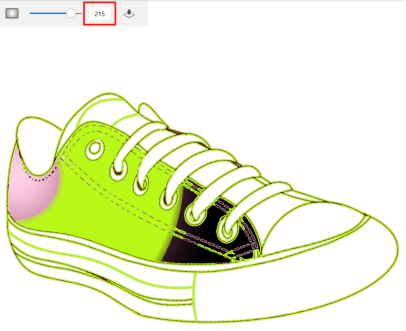
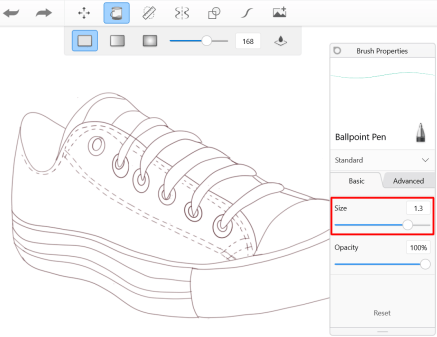
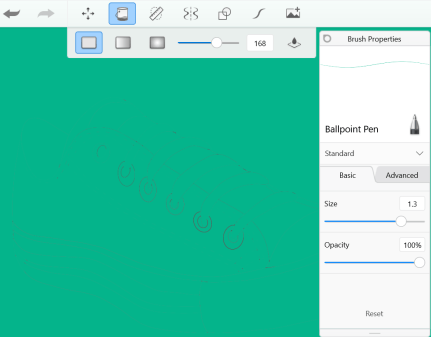
In the examples below, when Tolerance is set to 255 (the max), however, the results different greatly. This is due to a difference in stroke opacity and size (thickness). For a stroke using a Ballpoint Pen size of 1.3, with a fill tolerance of 168, the lines are ignored and the canvas is filled.
However, with a Felt Pen size of 4.5, where we’ve even increased the fill tolerance to the maximum value of 255, the lines held the fill within their borders. This is due to the thickness of the line (size). From above, you can see that fill tolerance can be set at a lower value and still fill the canvas, if the lines are thin.

Filling layers
You can choose to fill the current layer or all layers, using the following fill tools:
-
 Sample One Layer to fill the current layer.
 -
 Sample All Layers to fill all layers.
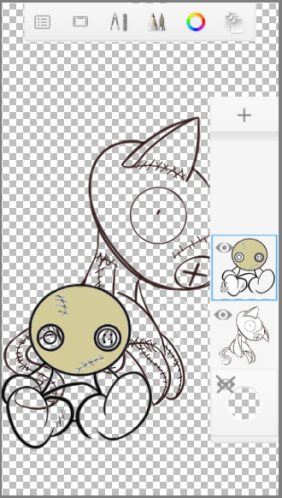
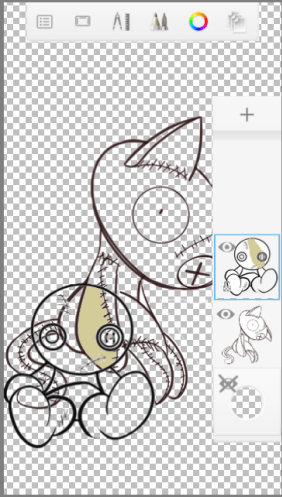
In the first image below, we used Sample One Layer, so the doll's head was the only area used to define the fill. For the second, we used Sample All Layers and tapped in the area within the head, where the arm is visible. So, though the lines of the arm are on a different layer, they help define the filled area.
Using Flood Fill in Sketchbook Pro for desktop
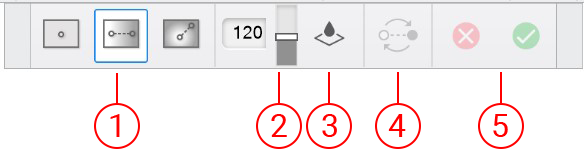
- Fills
- Tolerance
- Sample All Layers
- Reverse
- Cancel and OK
Flood filling an area
Fill active layers with color.
- In the toolbar, tap
 .
. - Select a color from the Color Editor.
- Tap to fill the current layer or for all visible layers.
|
Current layer
|
 |
|---|---|
| Selected Layer | Fill Outcome |
|
All visible layers
|
 |
- Select a fill.
- To accept the fill, click
 or
or  to decline the fill.
Changing fill tolerances
In the Fill toolbar, tap-drag the slider to change fill tolerances.

- Increase the tolerance to increase the range of colored pixels affected by the fill.
- Decrease the fill to reduce this.
The fill automatically updates, making it easy to get the tolerance setting just right.
Creating a gradient area
You can create a fill and then set the colors or select a pre-defined gradient fill from the Color Puck's Gradient Fill Palette.
- Create an area to be filled.
- With the Flood Fill tool selected, select a Gradient Fill from the Flood Fill toolbar.
- Click-drag to place the fill.
- Do either of the following:
-
To change the color of a manipulator, tap the manipulator
 and select another color from the color puck or Color Editor.
 - To select a different gradient fill, tap a manipulator and select another gradient fill from the Gradient Palette.
- To reposition fill manipulators, tap-drag a manipulator and reposition it.
- To add a manipulator, tap along the axis between manipulators.
To delete a manipulator, tap the Delete
 manipulator.
To change the tolerances of a fill, in the Fill toolbar, tap-drag the Tolerance slider. Increase the tolerance to increase the range of colored pixels affected by the fill. Decrease the fill to reduce this.
Setting the fill sample
In the Fill toolbar, do one of the following:
- To fill only the current active layer, ensure the icon in the toolbar is . If is visible, tap it to switch the icon to fill only the current layer.
- To fill all layers, ensure the icon in the toolbar is . If is visible, tap it to switch the icon to fill all layers.
Inverting the direction of a gradient fill
Once your fill is created, in the Fill toolbar, click  to invert the order of the fill manipulators.
Using Flood Fill in Sketchbook for mobile devices
Fill the active layer with color, speeding up the painting process, working like a mask. You can select the flood color before or during the fill.
Filling an area
If on a handheld device, tap ![]() , then
, then ![]() Fill.
Fill.
If on a tablet, tap ![]() Fill.
Fill.
- Select one of the fills.
NOTE: Fill manipulators can be added, moved, or removed.
- To add a manipulator, tap anywhere along the fill line.
- To move a manipulator, tap-drag it to the new position.
- To remove a manipulator, tap-drag it away from the fill line. It will disappear.
- Tap an area to fill it.
NOTE: To change the color of the paint, tap
 , then tap where you to fill that area. You are still in the Fill tool
 - Tap
 to accept the changes or to decline.
Changing flood fill tolerance
In the Fill toolbar, do the following:
- If on a handheld device, tap
 , then tap-drag the slider to change flood fill tolerances.
 - If on a tablet, tap-drag the Tolerance slider.

- Increase the tolerance to increase the range of colored pixels affected by the fill.
- Decrease the fill to reduce this.
The fill automatically updates, making it easy to get the tolerance setting just right.
Filling one or all layers
- In the Fill toolbar, do the following:
- If on a handheld device, tap Tolerance tool to access the Sample Layers tools.
- If on a tablet, go to Step 2.
- Select one of the following:
- To fill only the current active layer, ensure the icon in the toolbar is . If is visible, tap it to switch the icon to fill only the current layer.
- To fill all layers, ensure the icon in the toolbar is . If is visible, tap it to switch the icon to fill all layers.